Inside or outside size: which do I type?
Type the inside size. Our boxes are measured crease to crease, the way box makers quote them: that's the room your product gets inside. As a rule of thumb, add 1–2 mm to your product's size so it slides in.
Sizing a box
- Measure your product at its widest points: length, width and height. Measure the real thing: a cap, a label or a handle can stick out.
- Add 1–2 mm to each number. That bit of room lets it go in and come out without a fight.
- Type those numbers as the length, width and height. On the drawing they run from crease to crease.
- Pick your board. Its thickness never moves these creases; it only changes the details around the folds (see how thick the board should be).
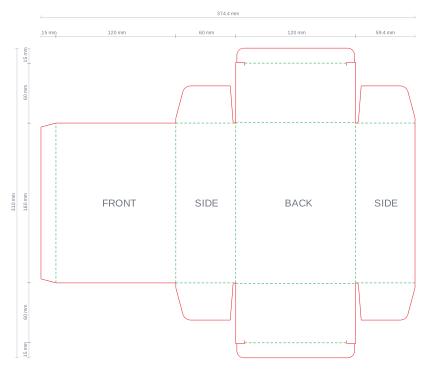
What about the outside size?
The outside is a little bigger, because the board wraps around your sizes and every wall adds its own thickness. If an outside size really matters (a courier's size limit, a shelf, a carton it has to fit in), ask your printer to check it against the dieline.
Bags, pouches and cup sleeves
Bags and pouches are sized by their front face: the width and height of the finished bag lying flat, plus the gusset where it has one. Leave room for the product to go in and for the seal to close; your printer knows how much their material needs. A cup sleeve takes the cup's own sizes.
The PDF says which kind of size it is: the block under the drawing has a Sizes line, “crease to crease” on a box.
Next
Still stuck?